Abstract
This document is a member of the Bare Series of WAS topics distributed in both stand-alone and in collection form. The latest renderings and source are available on GitHub at http://pglezen.github.io/was-config.
Table of Contents
If you lock down your service provider too tightly, not even your testers can invoke it with SOAP-UI. This section explains how to configure SOAP-UI to invoke a web service that only accepts payloads with timestamps signed by certain parties. Of course, one of those parties needs to be the tester.
These steps describe how to create a tester key store for use in signing requests to the provider. There is no requirement that this be done on WAS. One could use the JDK keytool if desired. The WAS admin console is just easier. Since there is no requirement to manage this keystore as part of a cell, it is not created within the cell configuration and synchronized across nodes.
The public certifiate associated with the tester's key is exported so that it can be included within the provider's trust store.
- In the WAS admin console, navigate to → → .
-
Click the button.
-
For Name, enter
Tester. -
For Description, enter
Key store used by testers, not by WAS. -
For Path, enter a fully qualified path name
outside the cell configuration directory. The filename extension
should be
.jks. - Enter a password for the key store.
- For Type, select .
- Click .
-
For Name, enter
- For the Tester key store, click the Personal certificates link to create a new public/private key pair.
-
Click the button and select
from the dropdown list.
-
For Alias, enter
tester1. -
For Common name, enter
Acme Tester 1. - For Validity period, enter a suitable validity period.
-
For Organization, enter
Acme. - Enter any of the other fields you like and click .
-
For Alias, enter
-
Extract the Tester1 public certificate.
- In the personal certificates list, check the box next to tester1 alias and click the button.
-
In the Certificate file name field, enter the fully qualified
file name of the certificate file with a
.cerextension. This will be the location from which it will be imported into the service provider's trust store. - Click .
-
Import the tester1 certificate into the provider trust store.
- Navigate to the Signer certificates section of the CC Provider trust store.
- Click the button.
-
The alias is not so important. It's good to enter something related to the
certificate to be imported. The
tester1alias used for creating the certificate is a good choice. - Enter the fully qualified file name of the tester certificate you extracted in the previous step.
- Click .
- Save the configuration.
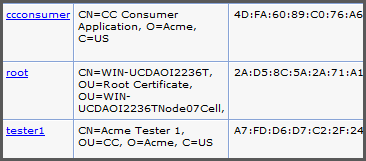
The root entry is the WAS cell root that is created automatically for each new key store. It does not play a role here. The ccconsumer certificate belongs to the consumer application and tester1 is the tester certificate that was just imported. It will allow the service provider to accept requests signed by this tester.
The next section will explain how to configure the tester's SOAP-UI installation to sign requests with the new key.
In SOAP-UI we start with a SOAP project that invokes a service provider. The SOAP-UI has no WS-Security configured. They keystore and its passwords from the previous step are readily available.
-
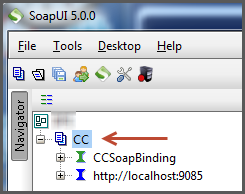
Double-click on your SOAP project to bring up the project configuration panel.
- Select the tab.
- Select the tab.
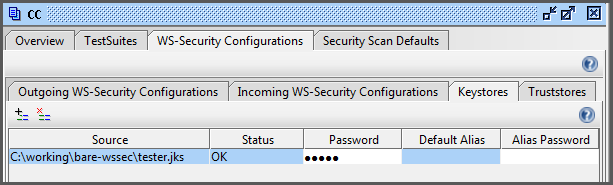
-
Select the button to add a new key store.
-
Select the tester key store (with the
.jksextension). - Enter the key store password. (There shouldn't be an alias password since we didn't password-protect the key.)

This completes the configuration of the key store within SOAP-UI. The key store panel should look like Figure 4.
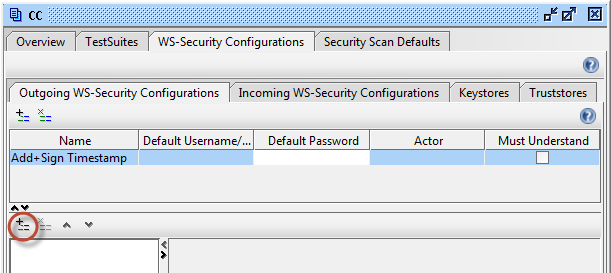
This section continues from configuration panel of the previous section.
- Select the sub-tab to the left of the sub-tab from the previous section.
- Click the button on the upper-left to add a new outgoing WS-Security configuration.
-
For the name of the configuration, enter
Add+Sign Timestamp. -
In the lower panel, click the button to add a new
WSS entry.
- For the first entry type, select Timestamp.
-
Set Time to Live to a liberal value like
120(seconds) to avoid any problems with clock skew between the test machine and the service provider. Uncheck the box for Millisecond precision.
- Click the again to add another WSS entry element.
- Select Signature for the entry type.
-
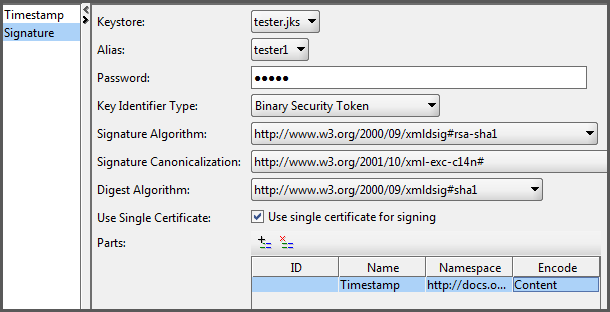
Add the following settings to the signature configuration panel.
- For Keystore, select tester.jks. This entry comes from the SOAP-UI key store configuration in the previous section.
- For Alias, chose tester1.
- For Password, enter the key store password.
- For the next five fields choose the options shown in Figure 7.
-
Click the button in the
Parts section. This creates a new row in the
table.
-
In the Name column, enter
Timestamp. -
In the Namespace column, enter
http://docs.oasis-open.org/wss/2004/01/oasis-200401-wss-wssecurity-utility-1.0.xsd. - In the Content column, select .
-
In the Name column, enter

This is the easy part. Start with any sample request payload (without the WS-Security header). Right-click in the request payload editor and select → as shown in Figure 8.
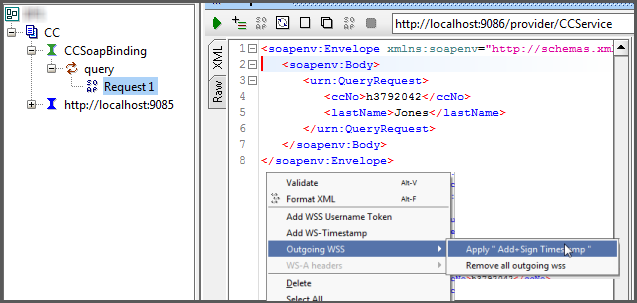
This will slap the WS-Security header right into the payload.
![[Caution]](images/caution.png) | Caution |
|---|---|
Do not alter the WS-Security header after generating the timestamp and signature (such as reformating it). In most cases this will invalidate the signature. |
After generating the timestamp and signature, be sure to invoke the CC provider within 120 seconds (before the timestamp expires). After the timestamp expires, simply generate a new WS-Security header using the same menu option shown in Figure 8. It will replace the existing WS-Security header with a new one automatically. There is no need to manually delete the old one. If you wish to simply remove the old WS-Security header without adding a new one, right-click into the request editor and select → .
Here are some troubleshooting tips for when things go wrong.
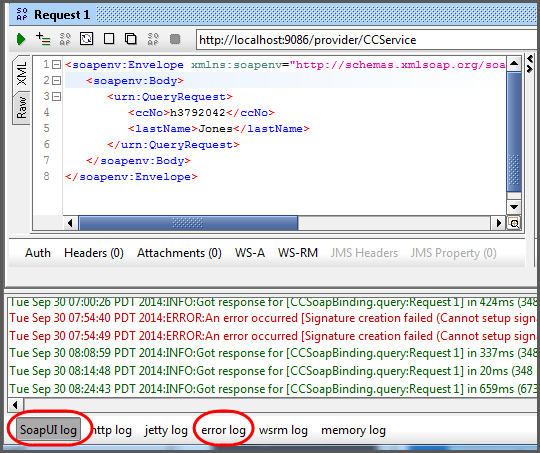
Check the logs on both sides. For WAS, there is always the
SystemOut.log file. For SOAP-UI there
the SoapUI log and error log
tabs at the bottom of the window as shown in
Figure 9.
As mentioned above, formatting the request payload corrupts the signature. But if you've already invoked the request (for better or worse) and you wish to view the security header, go ahead and reformat using by right-clicking in the request panel and selecting . This will allow you to see the header elements more clearly for troubleshooting.