Abstract
This document is a member of the Bare Series of WAS topics distributed in both stand-alone and in collection form. The latest renderings and source are available on GitHub at http://pglezen.github.io/was-config.
Table of Contents
WS-Policy is a very general framework for describing “non-functional” requirements for web services. WS-Policy applies to many aspects of web services such as addressing, reliability, notifications, and most commonly, security. The power of this concept lies in the potential to apply these policies to applications without requiring changes to the application code. WS-Policy addresses a wide variety of requirements in a vendor neutral way. This has obvious benefits; but also leads to its commonly cited drawback: its complexity and abstraction levels often discourage its adoption.
Since this document only addresses WS-Security, it often uses the terms WS-Policy and WS-Security interchangeably.
WS-Security documents, in order to be general enough to apply in a platform-neutral way, are restricted to what is to be done. Examples of “what” include “encrypt this field” or “add a time stamp and sign it.” But when it comes to implementing these mandates, there is still the question of how. The most common examples of "how" are “how is an encryption key to be procured” or “how is a certificate verified to be trustworthy” or "how is a certificate to be specified in a SOAP payload". In WebSphere Application Server (WAS), this separation of concerns is implemented with policy sets and policy set bindings.
The WS-Security configuration panels often distinguish between protection tokens and authentication tokens. In this context, protection refers to protecting the message from eavesdropping and/or corruption (whether accidental or malicious). Eavesdropping is addressed by encryption. Message corruption is addressed by signatures. In this document these tokens are asymmetric X.509 binary security tokens.
Authentication tokens contain identity information. This identity information may be encrypted and/or signed. It conveys to the provider the identity on behalf of whom the request is executing.
The WAS security runtime uses a framework to apply the same processing pattern to similar scenarios. But while the high-level processing is the same, details about the input can vary widely. A common example is the authentication process. One can authenticate via a user ID and password, a SAML assertion, an LTPA token, an SSL certificate, or others. Each of these types of authentication have a callback handler class associated with it. When specifying which authentication to use, the callback handler class is specified for processing and the callback class is populated with the input. Each callback handler expects input in the form of its associated callback.
This concept appears often in WS-Security configuration panels. When confronted with a callback handler configuration, it's just a way to pass data into the framework process. For WS-Security panels, this is used to convey the key and trust store information.
WS-Security headers support a
mustUnderstand
attribute. If this attribute is set to "1",
it means all intermediaries must be able to process the security information.
If a signature is included, the intermediaries must be able to verify it.
If intermediaries are not required to process the security token,
then this attribute should have a value of "0"
or the attribute must be absent
(zero is assumed when absent).
By default, a WS-Security binding configuration will add
mustUnderstand="1".
To override this default requires a custom property set on the binding.
This location for this custom property in the WAS admin console is
→ → → → .
The mustUnderstand custom property is defined under Outbound Custom Properties and is named
com.ibm.wsspi.wssecurity.config.request.setMustUnderstand
Another useful custom property for the client bindings is defined under Inbound Custom Properties. It determines whether the "consumer" requires a timestamp on the response. Its name is
com.ibm.wsspi.wssecurity.consumer.timestampRequired
Since this property is defined on the inbound section for a client, it is referring to a response (from the provider). By default this property value is 1; meaning the provider must sign sign a return time stamp or the response will be rejected. This restriction may be relaxed by setting this value to 0.
WS-Security policies can only be applied to Java bindings implemented with JAX-WS. They cannot be applied to JAX-RPC bindings. Services implemented with JAX-WS bindings will appear under → . Service provides are always considered to be managed.
JAX-WS client bindings can be either managed or non-managed, depending on how they are packaged and initialized. A JAX-WS client is only managed if it is retrieved via a local JNDI reference. Obtaining a JAX- WS service reference through either direct instantiation or through global JNDI look-up are not managed. Non-managed JAX-WS clients cannot have WS-Security policy applied to them because they bypass the required WAS runtime hooks.
Managed JAX-WS client have to be declared through either the
@WebServiceRef annotation or the
service-ref
entry in a deployment descriptor.
The @WebServiceRef annotation is the more convenient option.
But scanning for this annotation is restricted to EJB classes, Servlet classes,
JAX-WS handler classes, and some service endpoint implementations.
Moreover, it is not always practical to add @WebServiceRef
annotations to every class in which a service client is required.
Web application projects can have a
service-ref
element to their web.xml deployment descriptor.
The following is how such an entry would look for the CC example consumer
web application.
 <service-ref>
   <service-ref-name>service/CCService</service-ref-name>
   <service-interface>org.acme.cc.jaxws.CCService</service-interface>
 </service-ref>
This works when the JAX-WS client binding classes are packaged within
the WAR project, either directly compiled to the classes directory or
included as a JAR file in
WEB-INF/lib.
But if the JAX-WS client bindings are packaged as a utility JAR included
within the EAR file, an extra element is needed in the deployment descriptor.
 <service-ref>
   <service-ref-name>service/CCService</service-ref-name>
   <service-interface>org.acme.cc.jaxws.CCService</service-interface>
   <service-qname xmlns:pfx="urn:issw:bare:wssec:cc:query">pfx:CCService</service-qname>
 </service-ref>
The service-qname element allows the local
reference look-up to successfully determine the QName for the client
binding service class. The xmlns:pfx attribute is a
namespace declaration. The value should be the namespace declared for
your service element of the relevant WSDL document.
The signatures described here are considered protection tokens for the purpose of configuration within the WAS admin console. In our app-to-app scenario, the signature is doubling as an authentication mechanism of sorts, since only the possessor of the private key could have signed the message. But don't let this secondary usage misguide you when working through the policy set binding panels. The signature scenario exclusively deals with protection tokens, not authentication tokens.
The service consumer requires a key store containing a private/public key pair that identifies the service consumer application. The public key will be extracted so that it may be provided to the consumer for the purpose establishing trust.
This key store, key alias, and password will be configured in the general client policy bindings as a reference to a managed key store. The scripting burden of the WS-Security configuration would be eased if the key store and key alias names could be consistent among environments.
The service provider requires a trust store containing the signer certificates that the provider is willing to accept. For this WS-Security configuration, this amounts to the CCConsumer public certificate.
As with the service consumer case, choosing a consistent name for trust store simplifies the scripting of the service provider policy set bindings.
A policy set is a set of WS-Policy documents. As mentioned in Section 1.1, a policy document addresses what is to be done or enforced. Since both ends of a consumer-provider channel must agree on this, the policy document is usually shared between both parties.
In the present case, the policy document will specify the signing of a time stamp. Later sections address policy set bindings that configure role and environment specific configurations, mostly to do with key stores.
The following steps show how to create a policy set that specifies
- A timestamp to be added to the WS-Security header
- the timestamp to be signed
This policy set is simple enough to create from scratch.
In the WAS admin console, navigate to → → .
Click the button.
For Name, enter
Sign Timestamp.For Description, enter
Add a timestamp to the SOAP security header and sign it.In the Policies section, click the button and select . This will cause a WS-Security link to appear in the list.
Click the WS-Security link.
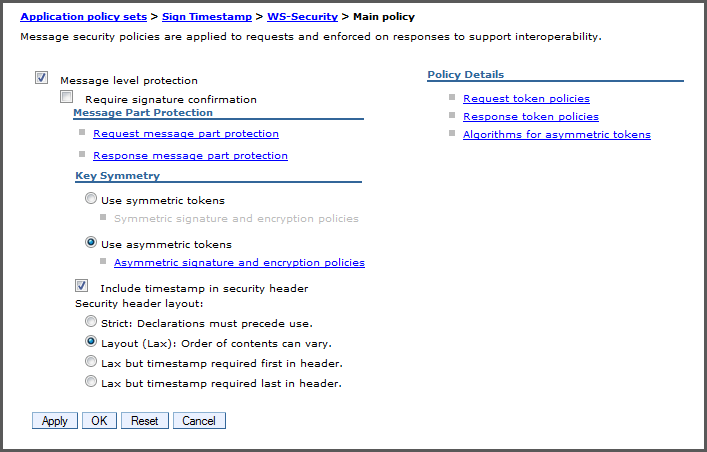
Click the main policy link.
This panel holds all settings for the WS-Security policy. The Message level protection box should already be checked. In the present case, all we wish to do is add a timestamp and sign it. We will remove the other items.
The checkbox Include timestamp in security header should already be checked.
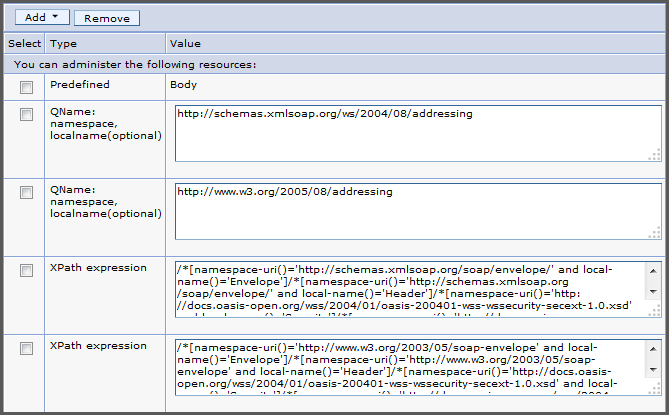
Click the Request message part protection link.
Under Encrypted parts, select app_encparts and click the . We remove the encrypted parts because we will not be encrypting the payload at the message level.
Under Signed parts, select app_signparts and click .
By default there are five signed parts specified: three general parts and two timestamp parts at the bottom. Remove the top three parts compresed of the Body and two WS-Addressing QName parts. You should be left with two XPath expression parts for the timestamp: one for SOAP 1.1 and one for SOAP 1.2.
Click for the signed parts and for the request message part protection.
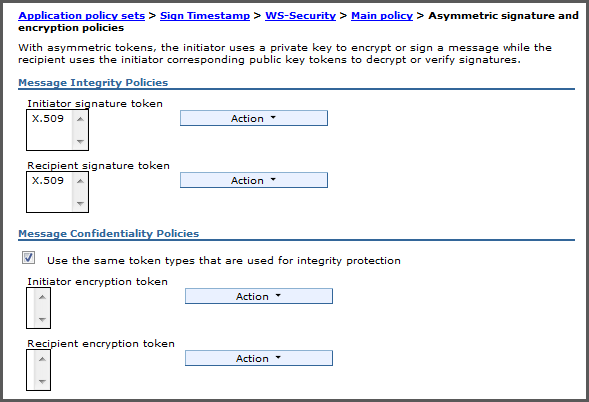
Click Asymmetric signature and encryption policies. Verify that X.509 is chosen for the Message Integrity Policy section as shown in Figure 3.
If they are not present, click the drop-down menu and select . Choose the version shown in Figure 4.

This completes the specification of the request message protection.
The default algorithms are fine; but may be adjusted. If you choose this section, only adjust the Algorithm suite. Do not change the Canonicalization algorithm or the XPath version unless you know what you're doing.
There are no request or response tokens for this configuration.
A policy set is usually shared between consumer and provider instances as well as among different environments. It is usually created once and exported; then imported wherever else it is needed.
To export the Sign Timestamp policy, navigate to
→ → .
Check the box next to Sign Timestamp and click the
button at the top. This will reveal a
Sign Timestamp.zip link. Click this link to
download the policy set export.
![[Tip]](images/tip.png) | Tip |
|---|---|
Because "Sign Timestamp" contains a space in the name for readability,
the admin console will supply a default file name of
|
Here are the steps to import a policy set.
In the admin console, navigate to → → .
Click the button and select From Selected location.
Click the button and select the policy set archive.
Click .
The imported policy set should now appear in the list of application policy sets.
The client policy set bindings for the CCConsumerApp application specifies how the consumer application will sign the SOAP payload elements required by the policy set. This amounts to specifying
- a key store along with the alias of the key used to sign the request,
- how the corresponding certificate is to be identified.
These concepts are illustrated below in Figure 5 as objects in a WAS configuration.
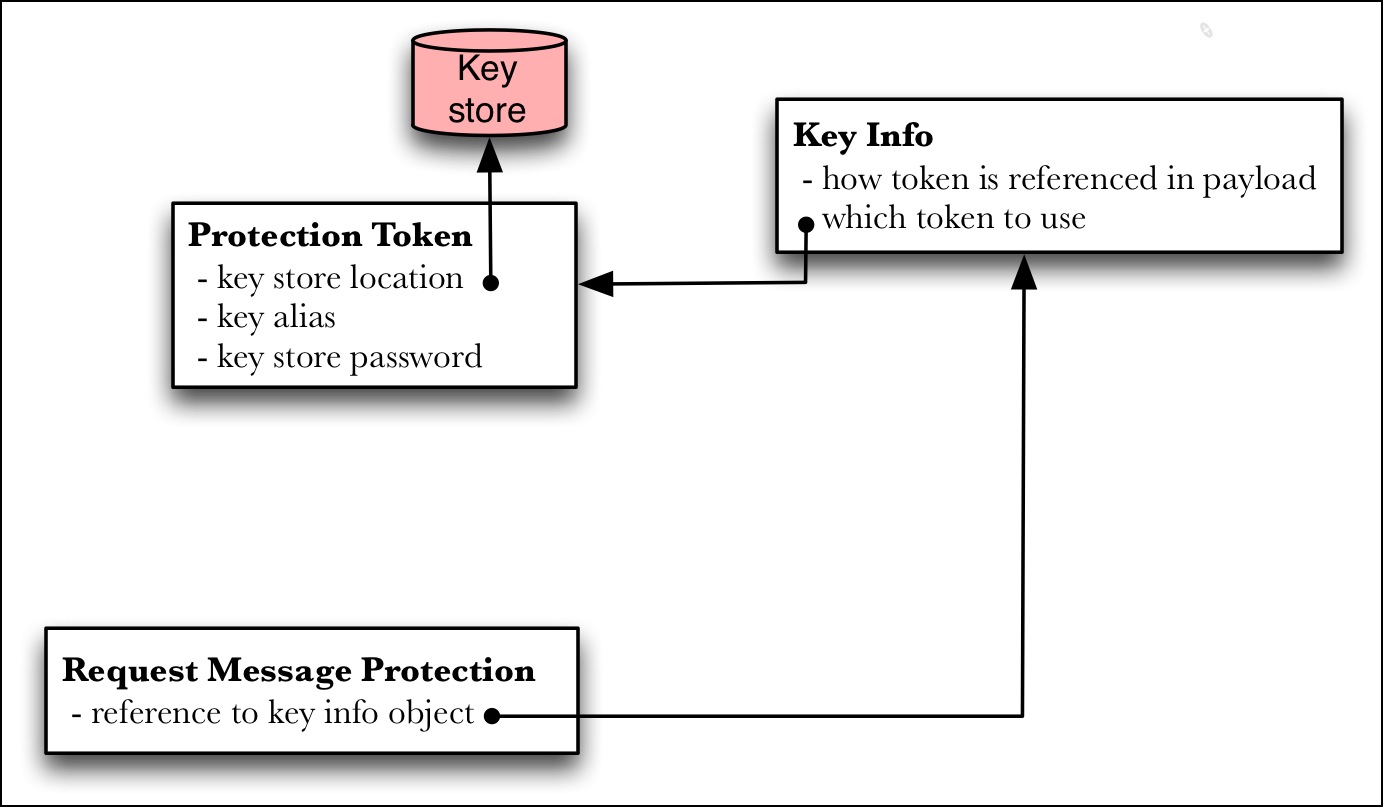
The protection token object references a key store and contains properties for specifying the alias of the relevant key in the key store along with a key store password. It represents a private key in the configuration.
The key info object determines how information about the key will be added to the payload. Examples include referring to the certificate's serial number, the certificate's SHA1 thumbprint, or just including the entire certificate as base64-encoded text. In addition to specifying how the key will be referenced in the payload, it also includes a reference to the key itself through through a reference to the associated protection token object.
The request message protection object binds the protection token and key info into a single configuration. Only when key info objects are referenced by a request message protection object are they "activated" by the binding.
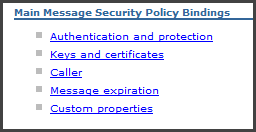
The objects in Figure 5 are configured in the WAS admin console by navigating to → → . After selecting from the particular binding, click the link. unfortunately not all objects are available from the same panel. Figure 6 gathers together the three screens needed for this configuration with the conceptual objects from Figure 5 superimosed on them for reference.
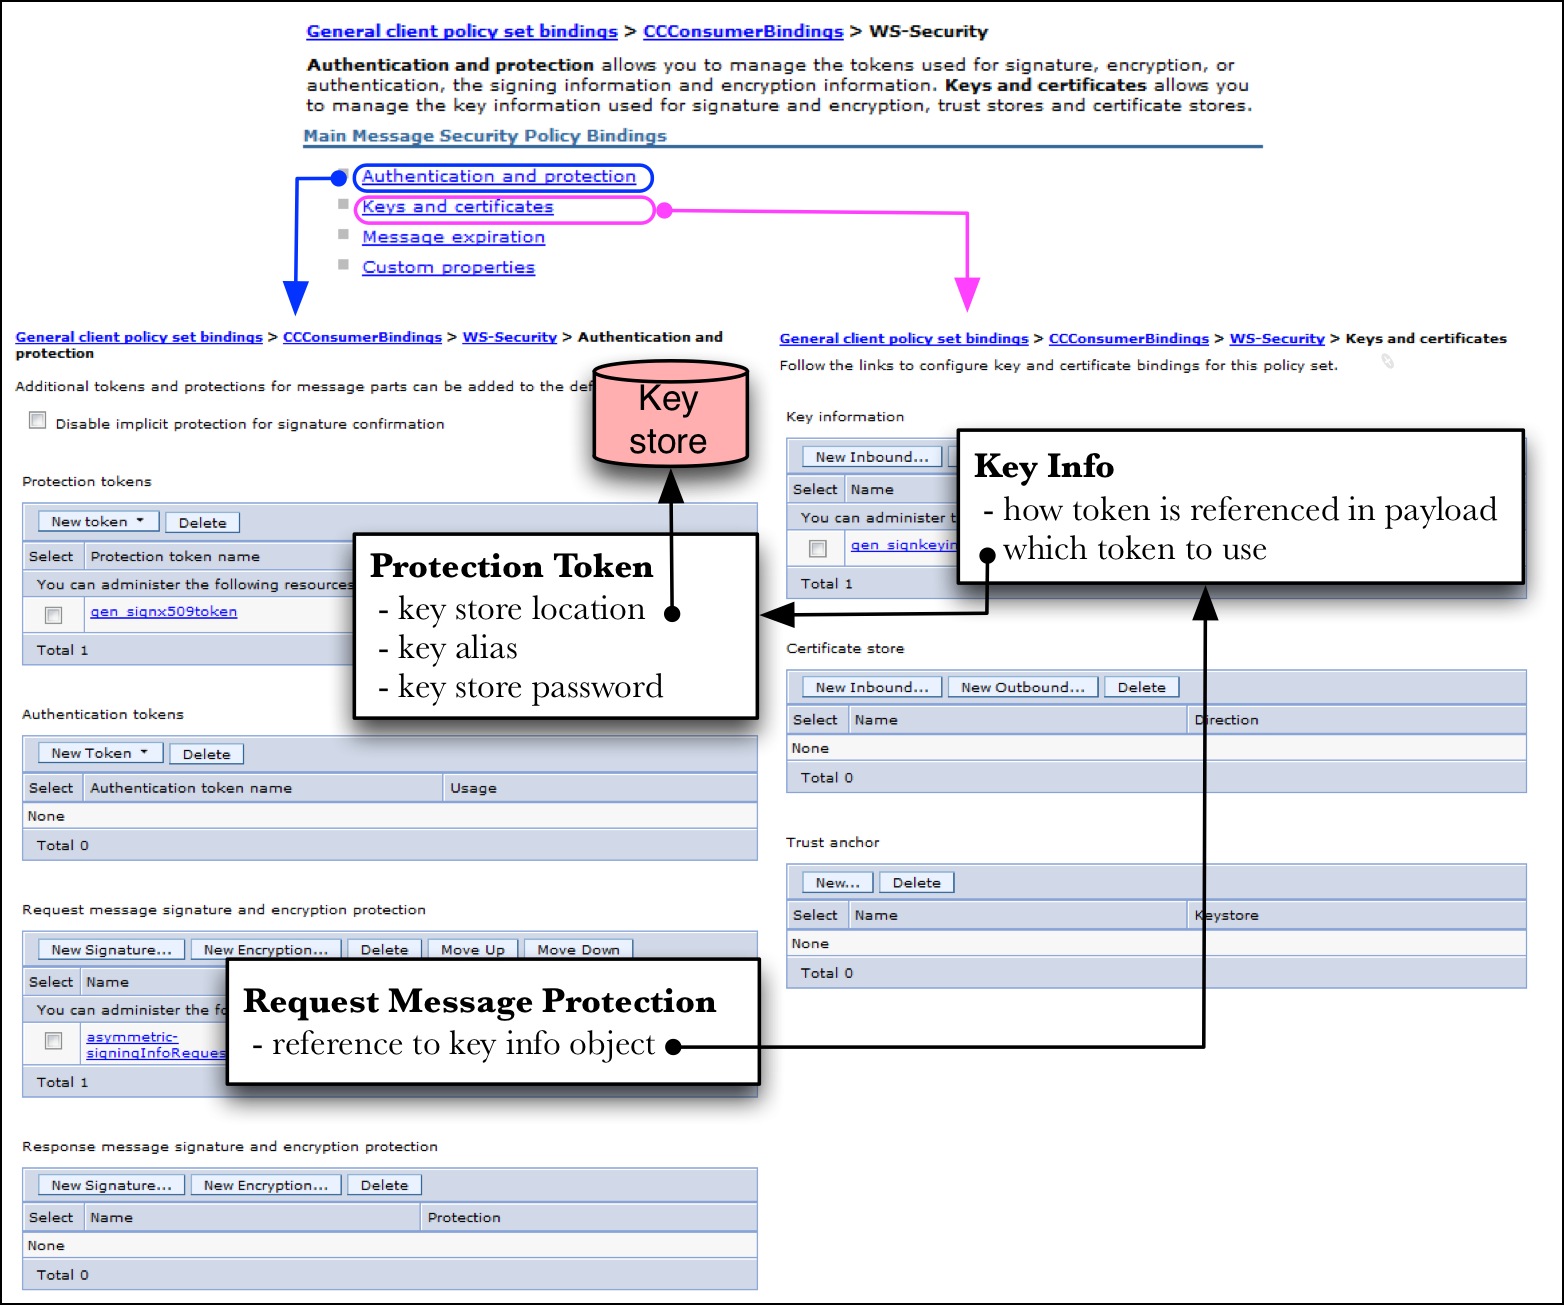
The WS-Security panel is shown at the top of Figure 6. The Authentication and protection link navigates to the panel on the left. The Keys and certificates link navigates to the panel on the right. The direction of the arrows in Figure 6 convey the direction of references. So the objects must be configured in the reverse order of the arrows so that the references may be resolved.
- Configure a managed key store as described in Section 2.1.1.
- Create a protection token object referencing the key store.
- Create a key info object referencing the protection token.
- Create a request message protection object referencing the key info object.
- Add custom properties.
The panel for the last item is not shown in Figure 6. But the Custom properties link to its panel is shown near the top.
These instruction show how to create a client policy set binding from scratch the supports the signing of a timestamp. It presupposes the configuration of a managed key store named CCConsumerkeyStore that holds the signer key and certificate. The alias for the signer certificate is ccconsumer.
In the Admin Console navigate to → → .
Click the button.
For Bindings configuration name, enter
CCConsumerBindings.For Description, enter
Specify key and key info to generate a signature for a timestamp.In the empty list of policies, click the button and select WS-Security from the dropdown list.
This reveals the four sections for the message security policy bindings. This will be the starting point for much of the binding configuration and will henceforth be referred to as the bindings list of four.
Select the Authentication and protection link from the bindings list of four.
Under Protection tokens click the button and select Token generator. The client is a token generator (instead of consumer) because the client provides the signature of the timestamp.
For Name, enter
gen_signx509token.This name can be arbitrary. For this scenario, we stick to the convention used by the sample bindings included with WAS. The "
gen" portion of the name refers to its role as a token generator ("con" for consumer is an alternative). The "sign" portion designates the role of a signatue signer ("enc" for encryption is the alternative).For Token type, select X509V3 v1.0.
Click the button. This adds the entry to the list of protection tokens. But it still requies additional configuration. So click the gen_signx509token link under protection tokens.
Near the bottom under Additional Bindings, click the Callback handler link.
Under the Keystore section, choose the CCConsumerKeyStore managed key store created earlier. Since it should only have a single key pair, the Name and Alias are populated automatically. You must still provide the password.
Click twice and save the configuration.
At this point, your binding configuration ha sspecified the key to use for the signature (the policy set determined what to sign). When the service provider receives the signature, it needs a way to determine what certificate to use for verification. This information is called the key info and there are several standards-based ways to specify it. We specify the embedded token option in the next steps.
Navigate back to the General client policy set bindings panel of Step 1. You should see the new CCConsumerBindings entry.
Click Keys and certificates.
Under the Key information section, click New Outbound. We choose outbound because the signature will be outbound from the consumer.
For Name, enter
gen_signkeyinfo.For Type, select Embedded token from the dropdown list.
For Token generator or consumer name, choose the gen_signx509token key entry created in the previous section.
Since we are developing this binding from scratch, it should be the only entry available. If instead we had copied a sample binding to modify, there would be many entries available and we must take care to choose the right one.
Click and save.
At this point you have specified a key for signing the timestamp and specified how the key identity is to be conveyed.
Navigate back to the binding list of four (click WS-Security in the bread-crumb tail at the top) and select Authentication and protection.
You'll see the key definition we created earlier under Protection tokens. It references a particular key in a key store. This protection token was itself referenced in the previous section by a key info object (Step 19). These definitions by themselves do activate them. To be active, they must be referenced by either a request or response message protection object.
Under Request message signature and encryption protection, click the button.
For Name, enter
asymmetric-signingInfoRequest.For Signing key information, choose gen_signkeyinfo from the dropdown list. This was the key info we created earlier and should be the only choice available.
Click the link labeled Signed part reference default.
In the URL field, select http://www.w3.org/2001/10/xml-exc-c14n#.
Click and save.
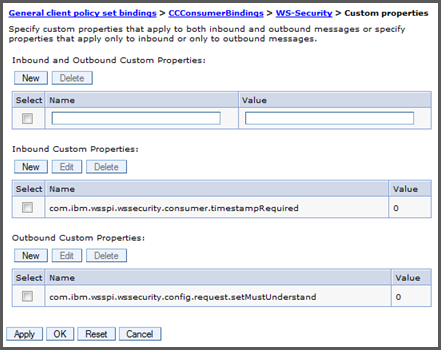
Navigate back to the bindings list of four and select Custom properties. We use two custom properties to specify that not all intermediaries are required to understand the signatures and that the client does not require a signed timestamp on the response.
Under Inbound Custom Properties, set the following property to
0:com.ibm.wsspi.wssecurity.consumer.timestampRequiredUnder the Outbound Custom Properties, set the following property to
0:com.ibm.wsspi.wssecurity.config.request.setMustUnderstandClick and save.
Exporting a client bindings is useful for backup and scripting. It is not typically shared with other client systems since policy set bindings are particular to their environment. In the present case, a managd key store is the only external reference. The external reference requires the following three items.
- the name of the managed key store
- the password for the managed key store
- the alias of the signer key
Importing a client binding configuration will require that these match with an existing key store of that these items be adusted to an existing key store.
To export a client binding configuration, simply check the box next to its entry and click the button. A link will be provided for starting the download.
The provider policy set bindings for the CCProviderApp application specify how the provider application will verify the signed SOAP payload elements required by the policy set. This amounts to specifying a trust store containing the trusted signer certificates. Figure 8 illustrates the WAS configuration objects needed to specify the trust store. It's a lot of overhead to simply specify a trust store. It's the price of the abstraction layer that accounts for all the different kinds of supported WS-Security scenarios.
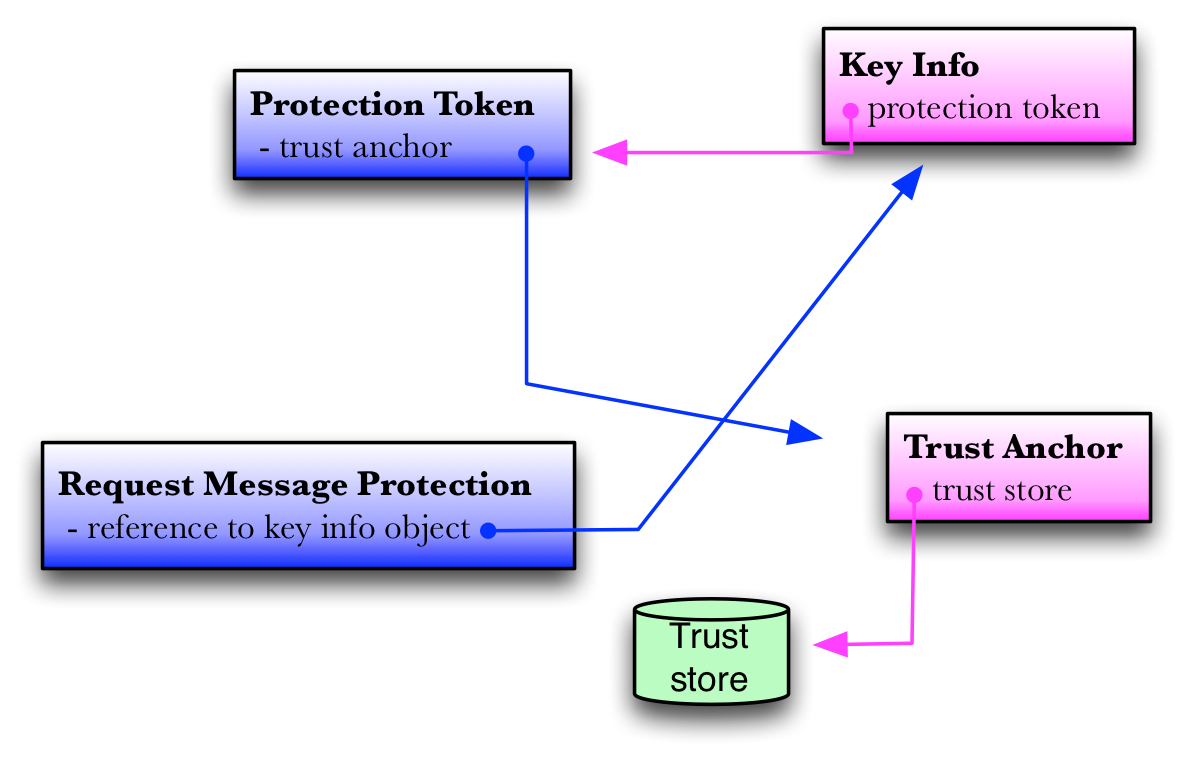
As with the client bindings case in Section 2.3, the order of configuration is determined by the references. The steps follow the arrows in reverse order.
- Create a trust store a described in Section 2.1.
- Create the trust store anchor object that references the managed trust store.
- Create the protection token object that references the trust anchor.
- Create the key info object that references the protection token.
- Create the request message protection object that references the key info.
The request message protection object determines which objects are active when the provider binding is assigned to a service. There are request and response types as well as signature and encryption types. For the present case, a request signature type is used.
The key info object is used to determine how to specify the certificate for generated requests. Since this is a provider configuration that will consume the token, no such specification is needed. Only a token generator has to specfy this. The only configuration in the key info for the provider is the protection token reference.
The protection token references key stores and trust stores. In this configuration it references a trust anchor object. It can also reference standalone certificates in the absense of a trust store.
A trust anchor object is a reference to a managed trust store.
These objects are configured in the WAS admin console by navigating to → → . After selecting the particular binding, click the WS-Security link. Unfortunately not all objects are available from the same panel. Figure 9 gathers together three screens needed for this configuration with the objects from Figure 8 superimposed on them for reference.
The WS-Security panel is shown at the top of Figure 9. From there one may navigate to either
- Authentication and protection
- Keys and certificates
Because the references cross between the two panels, one must maneuver between the panels to establish the references in the proper order.
These instructions show how to create a provider policy set binding from scratch that supports the signing of the timestamp. It presupposes the configuration of a managed trust store named CCProviderStore that holds the trusted signer certificates.
In the WAS admin console, navigate to → → .
Click the button.
For Binding configuration name, enter
CCProviderBindings.For Description, enter
Specify trust info to verify a signature for a timestamp.In the empty list of policies, click the button and select WS-Security from the dropdown list.
This reveals the five sections[1] for the message security policy bindings. This will be the starting point for much of the binding configuration and will henceforth be referred to as the bindings list of five.
Select Keys and certificates link from the bindings list of five.
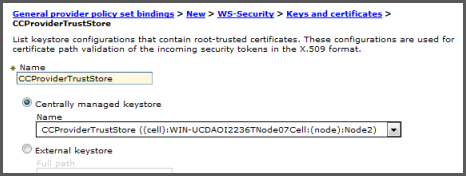
Under Trust anchor, click the button.
For Name, enter
CCProviderTrustStore.Select the radio button labeled and select the CCProviderTrustStore trust store you created earlier from the list.
Click and save the configuration.
Click WS-Security from the bread-crumb links at the top and click the Authentication and protection link from the bindings list of five.
Under Protection tokens click the button and select Token consumer. This provider is a token consumer (not generator) because the provider verifies the signature of the timestamp.
For Name, enter
con_signx509token.This name is arbitrary. For this scenario, we stick to the convention used by the sample bindings shipped with WAS. The "con" portion of the name refers to the role as a token consumer ("
gen" for generator is the alternative). The "sign" portion designates the role of a signature signer ("enc" for encryption is the alternative).For Token type, select X509V3 Token v1.0.
Click the button. This adds the entry to the list of protected tokens. But it still requires additional configuration. So click the con_signx509token link under the protected tokens.
Near the bottom under Additional Bindings, click the Callback handler link.
Under the Certificates section, select the second radio button and choose Trusted anchor store CCProviderTrustStore configured earlier.
Click twice and save the configuration.
At the point your binding configuration has specified the key store to use for verifying the signature (the policy set determined what to sign).
Click the WS-Security from the bread-crumb links at the top and click the Keys and certificates link.
Under the Key information section, click New Inbound. We choose inbound because the signature we be inbound from the provider perspective.
For Name, enter
con_signkeyinfo.Note there is no Type for the key info object as in the client bindings. The provider has to make due with whatever the client sends.
For Token generator or consumer name, choose the con_signx509token key entry created in the previous section.
Since we are developing the bindings from scratch, it should be the only option available. If instead we had copied a sample binding to modify, there would be many entries available and we must take care to choose the right one.
Click and save.
Navigate back to the binding list of four (click WS-Security in the bread-crumb trail at the top) and select Authentication and protection.
Under Request message signature and encryption protection, click the button.
For Name, enter
asymmetreic-signingInfoRequest.For Signing key information, choose con_signkeyinfo from the dropdown list and click . This was the key info we created earlier and should be the only choice available.
Click the button at the bottom.
Click back into the asymmetric-signingInfoRequest that was just created.
Click the link at the bottom labeled Signed part reference default.
Click the .
In the URL field, select http://www.w3.org/2001/10/xml-exc-c14n#.
Click and save.
There are no custom properties required for the provider. Only the client bindings require custom properties.
Exporting a provider binding is useful for backup and scripting. It is not typically shared with other systems since policy set bindings are particular to their environment. In the present case, a managed trust store is the only external reference. The external reference requires the following two items.
- the name of the managed trust store
- the password for the managed trust store
Importing a proivder binding configuration will require that these match with an existing trust store or that these items be adjusted to the existing trust store.
To export a provider binding configuration, simply check the box next to its entry and click the button. A link will be provided for starting the download.