Abstract
This document explains how to quickly start working with DocBook using your Eclipse Web Tools Platform (WTP) environment. WTP is required only for the XSLT features it provides. This article covers Mac, Linux, and Windows.
Table of Contents
For this version of the article, I'm going to assume you have some reason to learn DocBook rather than try to provide a motivation. But just in case you stumbled on this document expecting an office suite replacement for products such as MS-Office, OpenOffice or LibreOffice, stop now. DocBook is not a WYSIWYG product. It has a considerable learning curve and should only be used by propeller-heads.
But perhaps you're already interested in DocBook but are wondering why use Eclipse to produce DocBook documents. I found Eclipse helpful for DocBook usage for the following reasons.
Eclipse has built-in support for stylesheet transformations. You have to make sure you download the right edition (the J2EE edition is a safe bet).
Eclipse has support for developing and running Ant scripts. You can get by without script support for your first few toy documents. But as you learn about the various parameters supported by the output configuration, provding the parameters via a command line becomes unwieldy.
Eclipse has spell checking support within its XML editors.
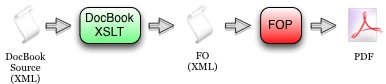
DocBook is basically a set of stylesheets that convert our content-centric XML source files into a desired format. So acquiring DocBook amounts to acquiring these stylesheets.
The DocBook stylesheets themselves are located at the following link.
http://sourceforge.net/projects/docbook/files/docbook-xsl-ns/
Download the latest version in an archive format suitable for your OS.
If you want to generate PDF files, then there are a few more downloads. DocBook doesn't generate PDF files directly. Rather, it generates an XML document structured as Formatting Objects, or FO. A separate processor developed by an Apache project called Formatting Object Processor (FOP) takes the FO output from DocBook and produces a PDF file.
FOP may be downloaded from the Apache FOP project.
http://xmlgraphics.apache.org/fop/download.html
Choose the binary download. You'll be asked to choose a mirror. On the mirror site, choose the binaries folder and download the latest stable distribution in the archive format supported by your OS.
FOP uses a hyphenation toolkit that is part of the OFFO project. The binary is downloaded from SourceForge.
http://sourceforge.net/projects/offo/
Download the file offo-hyphenation-binary_v2.0.zip.
Installing DocBook files pretty much amounts to unarchiving them. But it pays to plan things up front to ease the upgrade process when new versions of the stylesheets are released. The schemes described in this article differ slightly by OS.
Where you place files is somewhat arbitrary. This section is simply where I place them. Feel free to override these guidelines with any preference you may have.
I configure the DocBook related stylesheets in
/usr/local/share. One must
have admin rights to set up here. If you don't have admin
privileges, you may follow these steps substituting a location
under your user directory.
Expand the DocBook stylesheets into
/usr/local/share. The name of the directory created by expanding the archive should contain the version number of the stylesheets.Create a soft link named
docbookthat points to the directory just created by expanding the archive.ln -s docbook-xml-ns-1.77.1 docbookAfterward, your directory should look similar to this.
  /usr/local/share$ ls -l
  total 8
  lrwxr-xr-x   1 root  wheel    21 Jun  6 21:18 docbook@ -> docbook-xsl-ns-1.77.1
  drwxr-xr-x@ 46 root  wheel  1564 Jun  6 21:17 docbook-xsl-ns-1.76.1/
  drwxr-xr-x@ 51 root  wheel  1734 Jun  4 15:09 docbook-xsl-ns-1.77.1/
  drwxr-xr-x   7 root  wheel   238 Jun  7 18:22 java/
  /usr/local/share$
Expand the FOP and OFFO archives into the
/usr/local/share/javadirectory. For the FOP directory, create a soft link as was done in the previous step. This is not necessary for the OFFO distribution since we are simply poaching its library, not referencing it. The/usr/local/share/javadirectory should look similar to this./usr/local/share/java$ ls -l total 16 lrwxr-xr-x 1 root wheel 7 Jun 7 18:22 fop@ -> fop-1.0 drwxr-xr-x@ 17 root wheel 578 May 10 22:04 fop-1.0/ drwxrwxr-x 10 root wheel 340 Oct 29 2010 offo-hyphenation-binary/ lrwxr-xr-x 1 root wheel 13 Jun 6 20:10 xalan@ -> xalan-j_2_7_1 drwxr-xr-x@ 12 root wheel 408 Jun 6 19:29 xalan-j_2_7_1/ /usr/local/share/java$
Copy
fop-hyph.jarfrom the OFFO installation to thefop/libdirectory. (Or you can simply hard link to it.)
This completes the file system set-up for Mac OS X.
To configure a new Eclipse workspace for DocBook projects, install
the XML/XSL templates from the Starter Kit to quicken the creation
of new source files. These are located in the
templates
folder of the Starter Kit.
Import the DocBook Starter Kit as a plain Eclipse project or simply have the files somewhere handy.
Open → of your Eclipse workspace. As shown in Figure 2, there are two templates to import.
First choose → → → and import
templates/xml/docbook-new.xmlfrom the Starter Kit. This will create two new creation templates for XML files named DocBook Master and DocBook Section as shown in Figure 2.Then choose → → and import
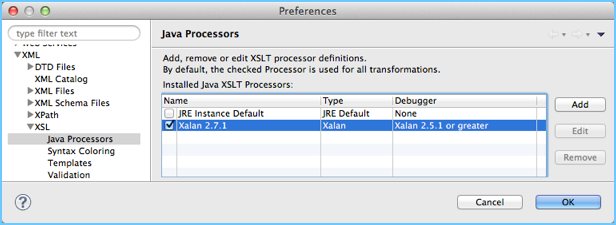
templates/xsl/customization-pdf.xmlfrom the Starter Kit. This will create a single creation template for XSL files named DocBook Customization.To use Xalan for XSL processing run configurations, navigate to → → as shown in Figure 3 and choose Xalan from the list.
This is only meaningful if you intend to execute the DocBook stylesheets directly from an Eclipse run configuration. If you invoke the stylesheets from an Ant script as described in the next section, the Xalan processor is specified in the Ant script.

We need to configure our DocBook project dependencies independent of where we install them on our file system. Since we usually expect to source-control our DocBook source and build-scripts, we need to organize our Eclipse workspace so that file system and OS dependencies don't creep into source-controlled artifacts. This is accomplished on most platforms with soft links and build links.
Create a new project to hold the DocBook source. The type can be a simple project.
Create a directory named
softlinks.Make the DocBook and FOP installations appear to reside in our project under
softlinksdirectory. Whether copies of those directories need to reside there depends on the OS platform. Linux and OS X support directory soft links. Windows does not. The Eclipse platform itself supports links for files, but not directories.Linux and OS X users can use the following technique.
Open a terminal to the
softlinksdirectory.Run the following command.
ln -s{path to DocBook installation} docbookRun a similar command for the FOP folder.
ln -s{path to FOP installation} fop
Windows users must actually copy these folders into their Eclipse workspace under the
softlinksdirectory. This is not a very attractive solution. I wasn't able to make the any of the following work in its place.- Windows Shortcuts - On a Windows desktop
or file explorer, a Windows shortcut looks like the real thing. But it's
actually a file with an .inf extension. In the Eclipse workspace, we
get
docbook.infandfop.inf. - Eclipse Links - Eclipse provides a linking
mechanism to refer to files and directories outside the workspace.
Unfortunately, this linking information is stored in the
.projectmetadata file that Eclipse uses for a project, not in workspace metadata. Thus it would also become source controlled and then imposed on others.
Copy the
buildfolder of the Starter Kit into your new project. This includes abuild-core.xmlthat defines source dependencies and sets a few global properties. The other files referencebuild-core.xmland generate specific output formats.Create the following folders in your new project.
images- used for storing image files.out- stores generated output for each of the output types.src- the source for your document content.
In most cases, you will want to create a subdirectory of
outfor each output type. These directories contain files that control the presentation of your documents. (Thesrcdirectory determines the content). If you generate PDF output, apdffolder would contain the customization layer. If you generate HTML or EPUB output, thehtmlorepubfolder would contain the your CSS files.
You're ready to start writing your DocBook source!
Eclipse uses an external tools configuration to execute external tools. One of the most common external tool is the Ant build script. Several Ant scripts are included in the Starter Kit. The most convenient way to execute these scripts is to execute them from a external tool configuration that stores its parameters and dependencies in a single place and is invoked at the click of a button.
The external tools configuration dialog is invoked from → → . Right-click on Ant Build and select . This panel has several tabs to be configured. These are described in the sections below.
In the main tab enter the name of the build. A good convention to follow is a short name for the document followed by the format of the build. In the example shown in Figure 2 the configuration for the HTML build of this document is named "DocBook HTML."
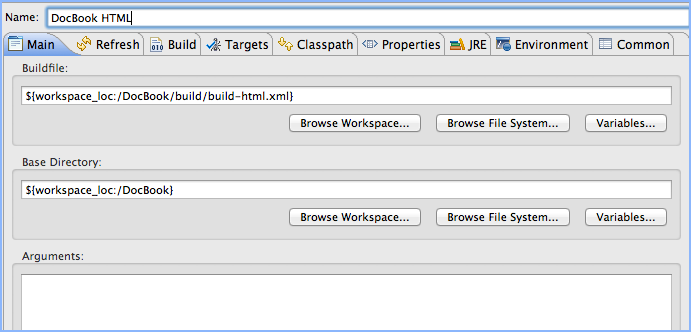
The Buildfile field holds the location of the Ant script.
The simplest way to complete this field is to click the
button and navigate to
<project>/builds/build-html.xml.
In a similar way complete the Base Directory
field. Set it to the root of the workspace.
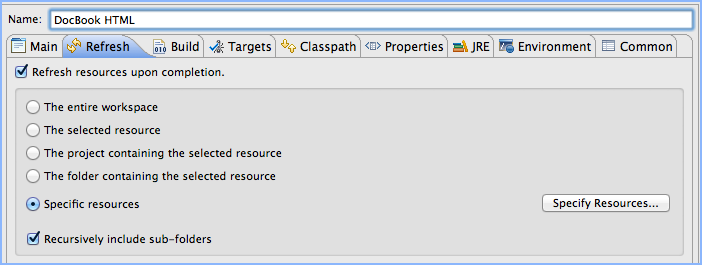
Eclipse often caches elements of its workspaces to improve performance.
Changes that an external tool makes to the file system are not immediately
noticed by the Eclipse workspace. This can always be remedied manually
by selecting an altered resource (or folder containing it) and pushing
the on your keyboard. This tab provides for
accomplishing this automatically. Several operations are available.
The trick is to only refresh as much as you need since the more you ask
to be refreshed, the longer it takes. In our case, we want to refresh
the out directory since that is
where our build scripts place their artifacts.
Check the box marked
.
We won't necessarily have a resource selected when the build script is
run, so it's safest to choose
and click its button. Choose the
out directory.
An Ant script often has several targets that represent the production of some artifact. This panel allows one to choose a particular one. In the example shown in Figure 6, the box is selected. As it happens, This task declares a dependency on and . So those get built, too.
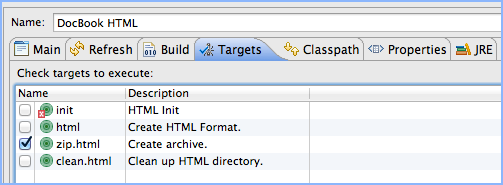
The button shows an error marker because it
it is defined in a separate Ant script called
build-core.xml that is referenced by all the other
scripts. The Eclipse Ant editor is not yet smart enough to follow
relationships across files. Fortunately Ant itself is.
This is the trickiest one. We need to include all the JARs that DocBook
will need to parse and transform DocBook source. The Xerces and Xalan
libraries can be downloaded from Apache's
Xalan
and
Xerces
sites.
But since they are also included with the Eclipse distributions,
it's easy just to reference them from the Eclipse plugin directory.
Select the
User Entries root element in the list and on the
right click the .
Navigate to the plugins
subdirectory of your Eclipse install root and select the
four files in Figure 7 that
begin with org.apache.x.
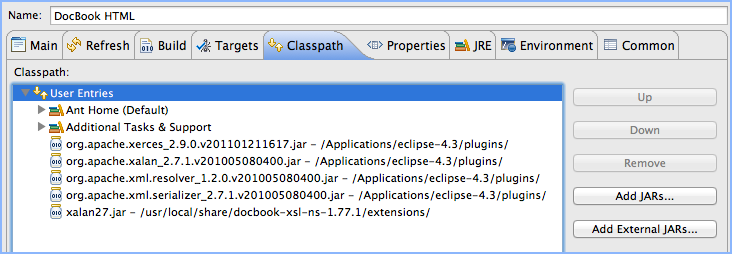
The DocBook Xalan extensions, xalan27.jar, are in the
extensions subdirectory of the
DocBook installation.
Creating the external tool configuration isn't that hard if you know what you're doing. But it's easy to forget if you haven't done it in a while. After you've followed these instructions once, it's easier to copy an existing configuration than to create a new one from scratch. You'll change the build file and choose different build targets. But the classpaths will stay the same.
This will be demonstrated by creating an exernal tools configuration for a PDF build. Open the External Tool Configurations as before. Right click the DocBook HTML entry and select . This creates a new entry called DocBook HTML (1). It has most of the settings you already need. Make the following changes.
- Change the name to DocBook PDF.
- Change the build fil to
build-pdf.xml. - Choose pdf in the tab.
- Click the button to test.
A similar process can be used for creating an EPUB build. Also, the same technique can be used for builds of other DocBook projects, not just different renderings of the same DocBook project. Just add these extra steps.
- On the tab, select the new project for the Base Directory field.
- On the tab select the new
outfolder for the new project.
[1] DocBook: The Definitive Guide, April, 2012. . Online: http://docbook.org/tdg51/en/html/
[2] DocBook XSL: The Complete Guide, Fourth Edition, September, 2007. . Online: http://www.sagehill.net/docbookxsl/index.html